My Jeep Compass Forum banner

HOW TO: Access interior fuse panel (& remove A pillar)

3 reading
88K views 17 replies 14 participants last post by  19Limited  
#1 · (Edited by Moderator)
You'll need a pry tool, a Phillips screwdriver and a t-27 Torx bit/tool.

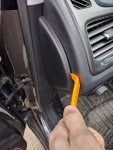
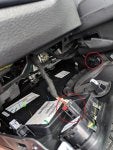
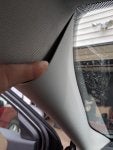
Images 1 & 2: Pry the side panel off. It's just held in with plastic clips.

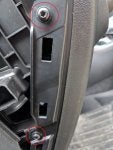
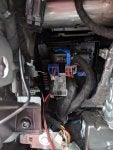
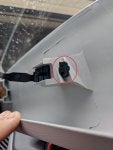
Image 3: Circled in red are the two Torx screws which must be removed.

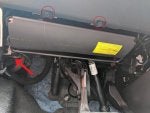
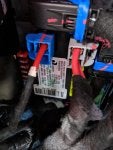
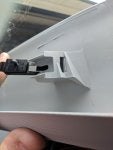
Image 4: Circled in red are the two Phillips screws that must be removed. That big unit with the yellow sticker is an airbag, FYI. The red arrow points to the bottom of the fuse box, which is still inaccessible.

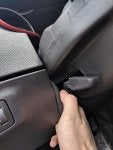
Image 5: Grab below the steering wheel where the panel has a gap and give it a good yank; keep in mind the headlight switch and another sensor (interior temp?) is attached to this knee panel.

See the next post for additional images.
 

Attachments

Discussion starter · #2 · (Edited)
Image 1: Circled in red are the headlight switch and temperature sensor? These need to be disconnected in order to completely remove the knee panel. Pop the red tab up on the headlight switch and squeeze to unlock the connector, the other connector does not have a locking tab, just squeeze the end of it to remove the connector. I only unhooked the headlight switch and laid the panel off to the side, they actually give you a decent amount of slack on the harnesses so you can leave the other connector attached and just stand the panel on end on the floor.

Image 2: Finally you can see the fuse box!

Image 3: Closer view of the fuse box from another angle.

Image 4: Here is a diagram which shows you what each fuse is numbered in comparison to what the owners manual tells you the fuses are.. The owners manual DOES NOT have a diagram, just a list of the fuse numbers, amperage and what their function is.. stupid FCA.

Image 5: Is a screenshot from the owners manual listing the interior fuses on the previously shown panel.

Installation is the complete reverse of all the steps you just took.

If you're looking to remove the A pillar trim to hide some wiring (dash cam), the next post details how to do that since this is why I had all this apart. I chose to use a "add a fuse" and hard wire my dash cam wiring. The fuse I chose was #94 a blue 15 amp, the bottom most fuse on the left side. It controls the lumbar adjust in the power drivers seat, the blower motor and the power outlets. This fuse is only powered when the ignition is on and running, I used a 3 amp fuse for my dash cam connection and the original 15 amp to complete the fuse circuit.
 

Attachments

Discussion starter · #3 · (Edited)
Information for removing the A pillar trim is as follows. I had mine off because I was routing the power wire for my dash cam, you can see it along the pillar and some of the wiring in the previous pictures. My vehicle has an airbag behind the A pillar trim, not sure if they all do but keep in mind there is an airbag there before you start poking around with any tools trying to remove the A pillar trim, NO TOOLS are required to pull the A pillar trim piece down, the headliner is flexible enough to pull it down enough to get your fingers in behind it.

Follow the steps in the first post to remove the side panel.

Image 1: You'll need to remove this little filler panel, it kind of twists out so you need to grab the side closest to the weather stripping and it will unlatch and you can pull it out.

Image 2: Get your fingers behind here and pull outward towards the center console, not directly straight back but like you're aiming for the shifter.

Image 3: Circled in red is the tab you need to push down to release the hanger? I'm guessing this is to keep the pillar from hitting you when the airbag deploys.

Image 4: Is the hanger released, Once you unlatch the hanger, youll have to wiggle the bottom of the pillar trim piece to get it out from between the dash and the chassis.

Image 5: Is my A pillar with out the A pillar trim piece. I routed my power wire for my dash cam along the path of the rear washer fluid rubber tube, and loosely secured it with zip ties.

Installation is the reverse of the instructions above. Note that getting the A pillar trim back in at the dash takes a little wiggling and looking in at the dash section from outside the car, it has a tab that has to go into a slot to properly be secured, its easiest to see and line it up by looking through the windshield from the outside while working with your hand inside.
 

Attachments

Discussion starter · #10 ·
Nope because this is the 2017.5+ section.
Hey Guys, im new to the jeep life.

The front wipers on my 2015 Compass stopped working, I tried looking for the fuse in the front fuse box but it only shows the rear.

Any clue where i can find it? I checked for power at the motor but its dead so im guessing the fuse is blown.
Sent from my Pixel 2 using Tapatalk
 
Discussion starter · #14 ·
After all of this, how would one get through the fire wall? I'm trying to wire some off road LEDs and need to get the rocker switch/wires from the engine bay into the cab. All the existing ports seem to be maxed out with the existing wires and leave little to no room to feed any additional wires through; let alone an entire rocker switch. Has anyone found a different route for wiring?


Thanks in advance!
Note the routing of the yellow wire.
Image


Sent from my Pixel 2 using Tapatalk